Syncing the Real time clock
Why do we need the Real Time clock?
The sBitx uses a battery backed real time clock(RTC) to keep track of the Coordinated Universal Time even when powered off or offline. This is required for the logbook and the FT8 to work properly.
The UTC maintained by the sBitx is independent of the time reported by the Raspberry Pi’s Desktop/Operating system. The real time clock is accessed and updated only through the sBitx software.
Technical Tip: The sBitx checks to see if the operating system time is synced with the UTC by runnning the ntpstat utility, if it reports that the Raspberry Pi time is synchronized to the UTC, then it copies the current time and date over to the Real Time Clock module.
Each time the sBitx starts, it looks to see if the time is synced and updates the RTC. The code for this in a function called rtc_sync() .
To update the Real time clock properly, you must have the ntp utility working on the Raspberry Pi desktop.
Install the NTP utilities
- Attach a keyboard and mouse
- Keep the sBitx online (Read here)
- Open the terminal with Ctrl-Shift-T (or choosing the Terminal icon from the top bar.
In the terminal, type the following:
In terminal, type:
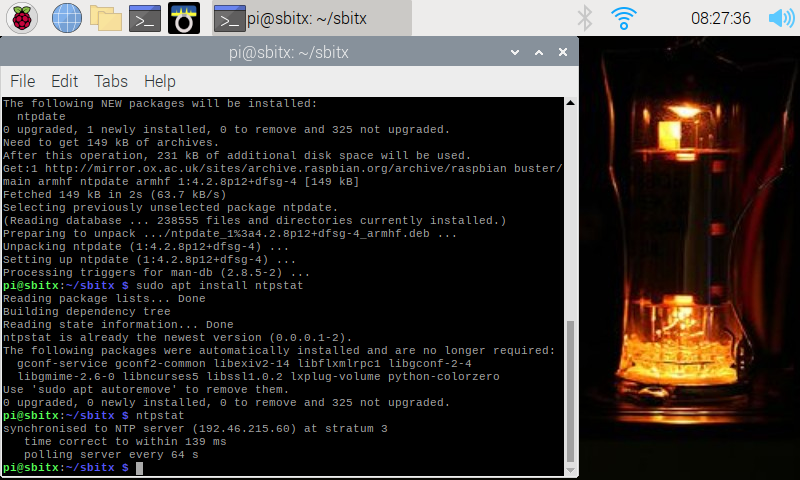
pi@sbitx:~ $cd sbitx
pi@sbitx:~ $ntpstat
If the ntptstat is working, it will report something like :
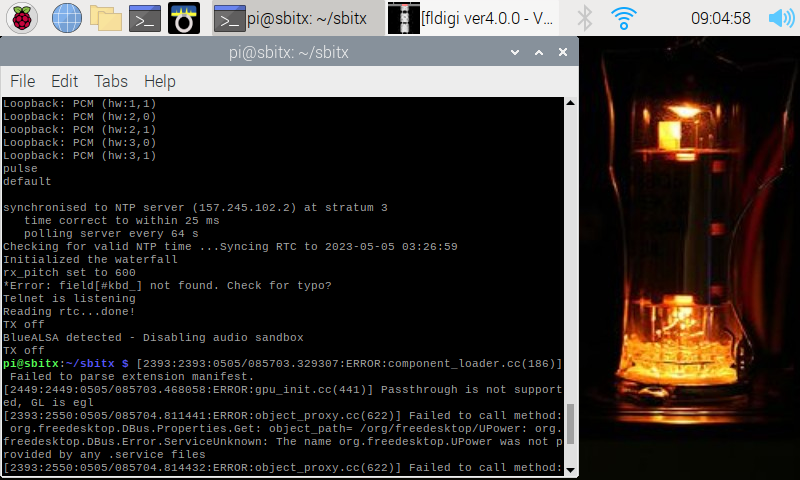
pi@sbitx:~$ ntpstat
synchronised to NTP server (164.100.255.123) at stratum 3
 time correct to within 57 ms
 polling server every 64 s
If not, we will have to install three new packages. Enter the following commands:
pi@sbitx:~$ sudo apt install ntp
pi@sbitx:~$ sudo apt install ntpstat
pi@sbitx:~$ sudo apt install ntpdate
After each of these commands, it will ask your permission to download, just press ‘Y’ for yes.
Now, reboot your sBitx from the Terminal.
Now, reboot your sBitx from the Terminal
sudo reboot
When it reboots, reopen the Terminal and type ntpstat again, this time it should synchronize with the network time. It may take a few seconds for the time sync to work, but it usually syncs within a minute. You may have to repeat the command a few times, see the last time of the screen shot below:
The UTC is now working and it will be picked up by sBitx next time it starts.
To check this, you can run the sbitx from the terminal with :
Checking if the RTC module is properly installed and working:
pi@sbitx:~$ cd ~/sbitx
pi@sbitx:~$ cd ./sbitx
Note that there is a dot before the /sbitx in the second command. The screen will show a number of messages (most of them are from the Chromium that the sBitx launches). Watch for the messages that says “synchronized to NTP server” and “Reading rtc…done!”. If you don’t get these messages, then the RTC module is not working properly.
See the screen shot below