The May 4th, 2023 update fixed many things. This post describes how to update the sBitx with these updates.
Step 1 Get Online and get the RTC running
- Connect a keyboard and mouse to your sBitx
- Get your sBitx online. To get help with connecting sBitx to the Internet, read here http://www.sbitx.net/index.php/2023/05/05/connecting-the-sbitx-to-internet/
- Check that the battery backed Real Time Clock (the RTC) is working properly. Read Syncing Real-time clock article.
You can still proceed to the next steps even if the RTC is not working properly.
Step 2 Update the sBitx software.
The latest version of the sBitx software is always on github.com. The easiest way to get this is use the update script and rebuild the sBitx. Here is how :
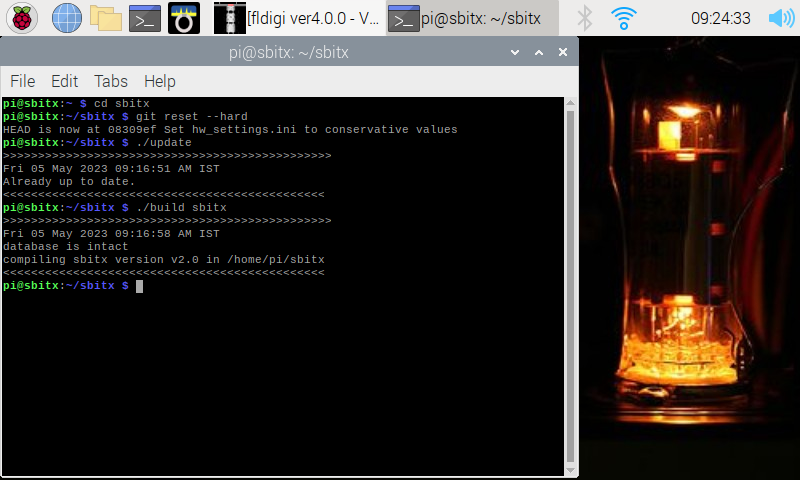
Open a terminal by clicking Terminal Icon from the top bar. Another way to open the Terminal is to Hold Ctrl and Shift down together and press T.
In terminal, type:
pi@sbitx:~ $cd sbitx
pi@sbitx:~/sbitx $./update
pi@sbitx:~/sbitx $./build sbitx
Here is what it will look like (the exact output from git pull maybe different, depending upon the version you are pulling from github):
Step 3: Calibrating the SWR/Power meter
The power meter will report your output so you can adjust it to save battery or excessive output that can destroy the transistors. The software updates after May 4th, 2023, also have an ALC (Automatic Level Control) that limits the power output of the PA to below 40 watts by monitoring the power and SWR bridge.
Variations in the diodes used in the power meter make it necessary to use calibration of the meter.
What if I don’t calibrate?
If you don’t calibrate, the radio will work all the same, at slightly reduced output. Others will hear you half an S-unit down.
What do I need?
You will need two things:
- An external SWR/Power meter that can measure the output power to within 10% accuracy. That is, if it reads 36 watts or 44 watts intead of 40 watts, it is good enough.
- A dummy load or an antenna . If you are using an antenna, it should have an SWR of less than 1:1.5 on 40 meters or 80 meters.
Checking the Meter Calibration Procedure
Attach the SWR/Power meter to the sBitx and a dummy load (or an antenna with an SWR of less than 1:1.5 on 80m or 40 meters.
- Start the sBitx, enter the passkey to get to sBitx main screen
- Set Mode to CW
- Set Freq to 7035 (or 3035 Khz, if you are using an 80 antenna) KHz
- From the Set CW INPUT to straight key
- Set Drive to 1
- Press the PTT to generate the carrier.
- Slowly bring up the drive until the external SWR/Power meter shows 20 watts.
- Note the reading of the on-screen power. The attached meter and the sBitx meter should be within a few watts of each other. If they are not, you will have to calibrate the meter.
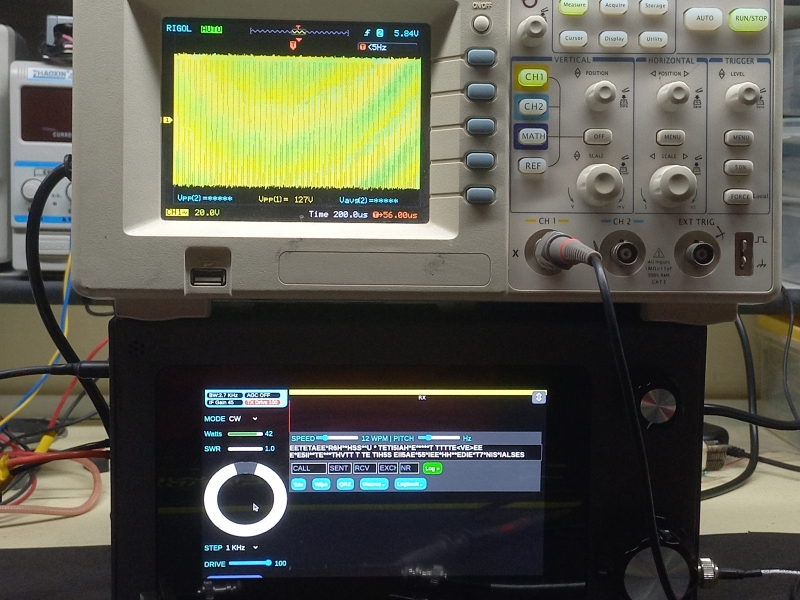
Here is picture of the well calibrated meter. Note that the sBitx power meter on the left is reading 42 watts and the oscilloscope connected across the dummy load is showing 127 volts peak to peak (127v peak to peak across a 50 ohms is 40.3 watts).
Calibrating the meter
- Keep the mouse and keyboard attached to the sBitx
- Start the sBitx, enter the passkey
- Select 40 meter band, mode CW. (If you are using an 80 meter antenna), select 80 meter band.
- From the left panel, scroll down to the Console button and press it to open the console panel.
- Console panel, type metercal and press Enter (from this point on do not touch anywhere on the screen)
- Press the PTT to generate the carrier and use the function knob on the top right to set the power reading on the sBitx to with 5 watts of the extrernal power meter reading.
- Change the mode, and wait for a minute to allow the periodic saving to settings to save the meter calibration.
For those who live dangerously
The meter calibration is stored at the value bridge in the user_settings.ini file. You will find the file at /home/pi/sbitx/data/user_settings.ini.
The two usual values for bridge are 100 or 72. If your uncalibrated power meter is reporting excessive power compared to the external power meter reading, you can just edit the bridge setting to 70 (if it is at 100).
Check that the values at 20 watts and 40 watts are within a few watts of each other between the sbitx readings and the attached power meter.
Re-Calibrating the Transmit output for different bands
The power amplifier gain decreases from 3.5 MHz to 30 MHz. The gain is compensated by decreasing the drive on lower frequencies and increasing it on the higher frequencies. These settings are in the file /home/pi/sbitx/data/hw_settings.ini. In almost all cases, these settings will work for you.
If you would want to recalibrate the drive for each band, this is how it can be done:
The sbitx can automatically run this calibration. Before you do that, you need
- The sbitx power meter must be calibrated as described above
- Attach a dummy load (not an antenna)
Start the sbitx, from the left panel, choose console. In the edit window of console, type txcal and press Enter. The software will trudge along for a minute or so and complete the calibration process.
If the settings get messed up, the there is a backup file called default_hw_settings.ini that you can use to restore the factory defaults.