FT8 Operations
FT8 is considered to be tough to set up. On legacy radios it usually involves several things to be set up between a regular radio and a computer and at least three pairs of wires (Mic, Speaker and CAT control).
However, with the sBitx, it is very easy. See the video
In FT8 when we refer to a frequency, we mean the audio frequency of signals within the 4 KHz bandwidth of the FT8’s RF frequency.
For the FT8, the BW (Bandwidth) should always be 4 KHz. This wide bandwidth setting enables the sBitx to receive almost twice as many signals as a conventional analog radio. It also eliminates the need to use SPLIT to transmit or receiver at greater offset from the base frequency.
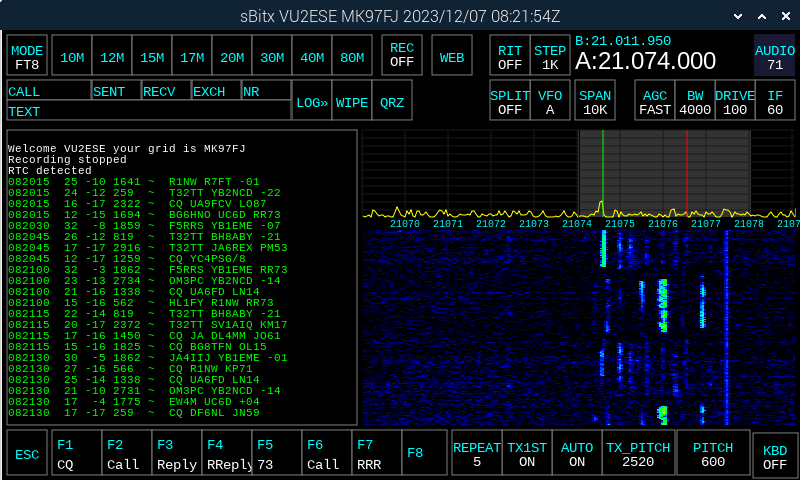
Choosing a TX frequency
If you transmit at an audio frequency already in use by someone, there are chances that your signal will overlap with their signal and neither of the signals will be decoded by others.
The TX frequency is indicated by a red line that appears on the spectrum display.
- Tune to the FT8’s RF frequency and the spectrum span to 10 KHz.
- Listen for a while. The FT8 signals will start to appear in the left pane, called the Band activity.
- Watch the waterfall for audio frequency gaps where no one is transmitting. They appear darker than other parts of the waterfall.
- Move the TX_PITCH using the slider (it will also move the red TX line on the spectrum) until the red line on the spectrum is positioned at the chosen unoccupied audio frequency.
TIP: It is best to choose an unoccupied frequency between 300 Hz and 3000 Hz. Most radios on air have crystal filters with restricted bandwidth and they may not hear you unless they are using split frequency operation.
How to respond to a CQ Call
- In the console window, all the FT decodes will start appearing at every 15th second.
- Choose any interesting callsign calling CQ to begin a QSO. The contact’s callsign is copied into the CALL box, their signal report is filled in the RECV box and the EXCH box is filled with grid location from the CQ message.
TIP: The decodes are in a relatively small font to accommodate more lines on the screen. It is possible that your finger may touch another message instead of the intended one. You can drag your finger on the console window until the intended line is chosen. - Your replies to chosen CQ will be automatically scheduled to transmit during the slot when the contact will be listening.
- The scheduled message is written out in gray color on the console.
- All the messages to and from you, that contain your callsign are shown in bright orange as it is the most prominent color to the human eye.
- Upon completion of exchange of the signals reports, the contact is automatically logged.
- If the contact replies to someone else instead of you, you will see those messages here as well. This way you will know that your call didn’t succeed and the contact has moved onto another QSO.
- If the caller responds to you, sit back and watch sBitx complete the QSO for you. The logger window will automatically fill the callsign and signal reports, and log the QSO.
Calling CQ
- To call CQ, press the F1 CQ button and the CQ will start at the next cycle.
- Watch the band activity for any responses to your CQ. These messages will be highlighted in yellow.
- Keep AUTO On to automatically respond to anyone who answers your CQ.
- If AUTO is kept OFF you will have to select the CQ reply message and initiate the QSO with that callsign.
- TX_1ST is used to choose the time slot for calling CQ. If it is turned ON, the CQ messages will go out at the first and third 15 second slot of the minute. If it is OFF, CQ will be transmitted in the second and fourth 15 second slot of the minute.
Time synchronization
The FT8 relies on starting the transmission/reception at every 15 second boundary. It is vital that the sBitx Real-time clock is properly synchronized within a second of the UTC. The RTC synchronizes itself using the NTP to within a few milliseconds each time there is Internet connectivity.
To maintain proper time, connect the sBitx to the Internet through Wifi or Ethernet and reboot and run the sBitx. The correct UTC time should automatically display at the top.